Cut List 4.1.1 Ruby Script Connects SketchUp & CutList Plus |
|
||
|
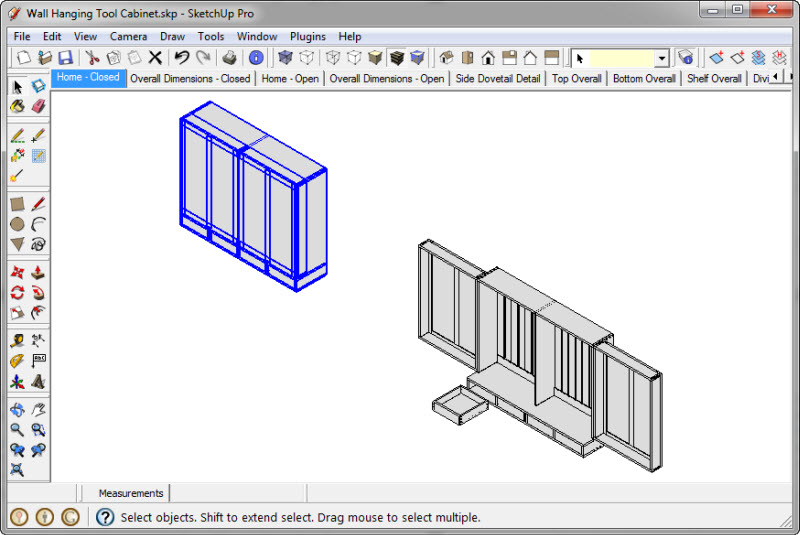
Normally one wouldn’t expect a minor revision to change functionality but merely fix bugs. However Steve’s changes in 4.1.1 make the interface between Cut List 4.1.1 and CutList Plus nearly seamless. Of my favorite SketchUp Ruby scripts this one ranks among the top. In fact, Cut List 4.1.1 is approaching the functionality I use in CutList Plus, and soon a new revision will probably convince me to drop CutList Plus from my design flow and only use SketchUp and Cut List. But not quite yet. BackgroundMy projects always start out the same – realizing my idea by sketching and designing in SketchUp, then producing shop drawings complete with a cut list. Having done that I am ready to go into the shop and prepare my stock. In addition to SketchUp I have always used CutList Plus for producing a cut list and parts list. SketchUp and CutList Plus do not naturally speak to one another; there is no export or import utility supported by either application that allows them to pass design information between them. However, SketchUp has a Ruby API and development console that allows third parties to produce scripts that can be used by SketchUp to extend its functionality. Most of these Ruby scripts are written by software developers, or wannabe software developers, and they are provided to you mostly for free. Steve’s Cut List 4.1.1 is just such a script. If you use SketchUp and CutList Plus this article is for you. If you don’t use one or both applications you should look into them. CutList Plus must be purchased, but it is not expensive, and it is well worth the price. There are several editions (Silver, Gold & Platinum) that range from $89.00 to $499.00, and serve the casual user to the professional. The Silver version is limited to 50 different parts, but that is enough to handle most furniture pieces. My Six Pane Oak Hutch has 49 different components. If you need more parts you can break a design down into sub-assemblies. Go to http://cutlistplus.com/ to read about the differences between these editions. Cut List 4.1.1 is free and can be downloaded by going to http://www.box.net/shared/ce18vpk36l. This is a zip file and must be extracted to the appropriate SketchUp Plugins folder. In the case of Windows 7 and SketchUp Pro 8 that folder is C:\Program Files (x86)\Google\Google SketchUp Pro 8\Plugins. You may have an older version and it could be slightly different, so examine the Program Files (or Program Files (x86)) folder to determine the exact address. For MAC or other operating systems check the SketchUp website at http://sketchup.google.com/download/. Once the zip file has been extracted to the Plugins folder you can open SketchUp and you will notice a new Menu item called Plugins. Under Plugins you will see a submenu called Cut List. This is what you would click to produce a cut list file. As I mentioned earlier, my design flow starts with SketchUp, then Cut List 4.1.1 to produce a comma separated value (.csv) file, which contains the design data, and finally CutList Plus to import the .csv file and produce the parts list, cost estimate, cutting layout and other reports. You don’t need CutList Plus. You may be satisfied with the reports Cut List gives you, as you will see in a moment are quite extensive. Or you can import the .csv file into Microsoft Excel and manipulate it there. Now Let’s Study an Example of how Cut List 4.1.1 Bridges SketchUp and CutList PlusWe will use a Wall Hanging Hand Tool Cabinet I design as an example. If you wish to follow along click on the link in the previous sentence to download the SketchUp model.
Select the Plugins/Cut List command. A menu selection page appears. With the CutList tab selected make the selections shown in the picture below. Any line you do not understand simply click the question mark icon to the right and a helpful text box will appear. Click the icon again and it disappears. My tool cabinet is made of all rough cut hardwood so I normally would not have selected Layout Output options. However, I thought you might like to see an example layout, so I did in this case. If I use sheet material such as plywood I would always select a Layout Output option and get a visual cut list layout.
If you use the metric system you may want to choose Force Board Feet. It is not necessary if you use Imperial units. Be careful naming components in your model. Notice in the picture above the keywords part, hardware, sheet, veneer, plywood, hardboard and mdf. These are keywords that indicate a component is either a sheet material or a part and not a component (you can use your own keywords). Do not use any of these keywords, or words containing them, when naming your components. If you do, those components will not be included in the Component cut list. I called one component a Drawer Partition and it was eliminated by Cut List 4.0.7 because “part” is contained in the word “partition”. I had to rename it divider. I haven’t checked to see if this is still the case in CutList 4.1.1, but best to avoid this situation. Choose the Layout tab and you should see a selection page like the one below. If you texture your components, for example with a texture named Cherry, you may want to select Layout By Material to sort your layout by material type. Note that I have selected all nominal sizes so the script will choose the appropriate one from the list. Since I have an 8” jointer, I am limited to rough cut boards about 7 ½” wide. I could choose 6” or 8” for the Nominal Board Width. I chose 6” in this case. I also chose a Board Length of 8’ in this example. As I said earlier, I don’t find layouts to be useful for rough cut hardwood material. Boards come in random length and width. Only the thicknesses are useful. But for demonstration purposes I am generating a layout here.
You may wish to left click the Save Settings button to save these selections as I did. Now click Run. Two information boxes will appear to tell you where Cut List 4.1.1 stored the .csv files requested. Write the locations down so they can be accessed later. Click OK after each message and you will see the Layout Page view of a cut list shown on the next page. Each board is nominally 6” wide (actually 5 ½”), 4/4 thick in this example and 8’ long. Above each board is the efficiency percentage (the board usage factor) which can be used in cost calculations.
Note that the boards are labeled with the SketchUp component name (Definition Name in the Entity Info box) and not the component’s instance or unique name (Name in the Entity Info box). You can print these layouts out with the Print Layout button. At the top of the Layout Page are a few summary items of interest. See the picture below.
Notice the total efficiency is calculated to be 75.54% and the total Bd Ft is 128.0. These numbers are very accurate for sheet goods but not rough cut hardwood. For rough cut hard wood you are better off developing a historical empirical number based on how you do things in the shop and use it to adjust actual Bd Ft requirements into purchase requirements and then multiply by Bd Ft price to get cost. One comment I would make about these layout diagrams verses CutList Plus layout diagrams. These are not terribly useful in the shop because they have no dimensions on them. CutList Plus produces a layout diagram with each part dimensioned so that you don’t have to cross reference the layout and cut list to figure out how to cut the parts. But I suspect in a soon coming release Steve Racz will include this capability.
Click the Close button on the Layout Page view
and you will see the parts list shown below. The entire list is not shown here because of its length. But let’s look at the headings. The first column is the Part #. This number is assigned by Cut List 4.1.1. Look at the Description column and you will see the Component names listed (Definition Name in the Entity Info box). In the second column, the Quantity column, is the number of instances of that component in the model. Remember that I told you not to use Select All in SketchUp to select your model, but rather to use the Select tool and select only the completed model. If you use Select All the Quantity column may be grossly inflated as will all subsequent calculations such as total Bd Ft. The Length, Width and Thickness columns are self-explanatory. However, check to be sure that the dimensions in these columns run in the correct direction of the grain. Sometimes you design a part (component) whose length is shorter than its width and Cut List 4.1.1 may place the longer width dimension in the length column. This is generally not a problem, but check to be sure. The Board Foot (per) and Board Foot (total) are the actual Bd Ft used by one component and then factored by the number of instances respectively. Efficiency (or board usage) factors are not a part of this calculation. The Total Length (Feet) column I have found no practical use for, but it appears to be the length per component times the number of instances. Notice at the bottom of the Cutlist Page view is a summary: Total Component Board Foot 68.23. Compare this to the 128.0 Bd Ft total at 75.54% efficiency reported on the Layout Page view. Even taking efficiency into account you are left with 68.23 verses 96.69. I suggest you ignore the Layout Page view report altogether. The Cutlist Page view reports the actual total. Adjust this with your empirical number and go with that. I use this Cutlist Page view primarily as a check to be sure all components were picked up correctly. Though I don’t examine it in detail I look for any glaring or outstanding problems. The detail checks I leave until I have a CutList Plus cut list. Connecting SketchUp To CutList Plus Using Cut List 4.1.1’s Output FileThe real magic of Cut List 4.1.1 lies in the .csv file stored in C:\Users\Joe Zeh\AppData\Local\Temp. The file is: Wall Hanging Tool Cabinet_CutListPlusImport.csv
Importing Wall Hanging Tool Cabinet_CutListPlusImport.csv into CutList Plus produces the parts list shown below.
There are a few minor problems with this cut list. First, the Sub-Assembly column has the same entry for all lines and is simply the SketchUp file name. So that column is not terribly useful. However, there is a way to structure your model so that this column is very useful, but that is beyond this article; maybe a future post on my blog. It is especially useful if you are a kitchen cabinet maker. The material type is labeled Dimensioned Lumber. That appears to be the default. Since I did not texture my components with a Material, the Material Name column has Non Assigned for each entry. Lastly, since I specified Layout Output option and nominal board thicknesses, the Thick(ness) column has 1” for all entries, meaning 4/4 boards. Let’s rerun Cut List 4.1.1 with the following changes: Choose the CutList tab and uncheck all “Layout Output”
check boxes. In CutList Plus re-import Wall Hanging Tool Cabinet_CutListPlusImport.csv and the cut list will look as follows:In CutList Plus re-import Wall Hanging Tool Cabinet_CutListPlusImport.csv and the cut list will look as follows:
Notice the change in the Thick(ness) column. Now we have our actual dimensions. Now I can clean up this cut list and save it in the same folder as my SketchUp model and with the same name. If you like letters for part numbers you can easily change that in CutList Plus too. The final cut list is shown on the next page. One other point I should make. Cut List 4.1.1 and CutList Plus agree on total actual Bd Ft; 68.23 verses 68.21 respectively. But CutList Plus allows you to choose your efficiency – it calls it Waste – factor. I am not going to discuss how to use CutList Plus in this post. I will reserve that for the future since it deserves its own post. Suffice it to say that CutList Plus is rich and powerful. In addition to a cut list it can produce a Bill of Materials, Project Proposals, Cost Sheets including labor and other parts such as drawer pulls, sheet cutting Layouts, manage inventory and much, much more. You can download a 30 day trial version and give it a whirl. The learning curve is short, so have fun. As I mentioned earlier, the file Wall Hanging Tool Cabinet_CutListPlusImport.csv can also be imported into Excel. But one note of caution is in order: Open the Window/Model Info dialog box. Select Units in the left column and Decimal from the Format drop down box. If you use Fractional, Excel will not interpret them correctly; you may end up with dimensions that appear as calendar dates in Excel. You can switch back to Fractions after the Cut List 4.1.1 output file is generated. Cut List 4.1.1 makes the bridging of SketchUp to CutList Plus or Excel seamless and easy; and who can argue with the price performance point. If you have never used it give it a try. I promise you will not be disappointed.
|

Berkshire Woodworkers

|

|


 Importing
to CutList Plus is done by either right clicking on the
file name and choosing Open With/CutList Plus 2009, or
opening CutList Plus and choosing File/Import and
selecting the saved .csv file. A menu page will appear
similar to that shown at right. Select Comma as the
Delimiter and check “First row has headers”. Next, in
the import column in each row I use the drop down box to
match up the columns. Note for Banding, <Info> and Notes
I choose <Skip this item>. I could do the same for
Sub-Assembly, Material Type, Material Name and Can
Rotate. But I left them in for discussion purposes. What
I really want is the Part#, part Description, number of
Copies, and the three dimensions. The rest of the
information I can deal with more easily in CutList Plus.
Since most of my cut lists will be similar I left click
“Save Filter Changes” to save these selections. Then I
click Finish.
Importing
to CutList Plus is done by either right clicking on the
file name and choosing Open With/CutList Plus 2009, or
opening CutList Plus and choosing File/Import and
selecting the saved .csv file. A menu page will appear
similar to that shown at right. Select Comma as the
Delimiter and check “First row has headers”. Next, in
the import column in each row I use the drop down box to
match up the columns. Note for Banding, <Info> and Notes
I choose <Skip this item>. I could do the same for
Sub-Assembly, Material Type, Material Name and Can
Rotate. But I left them in for discussion purposes. What
I really want is the Part#, part Description, number of
Copies, and the three dimensions. The rest of the
information I can deal with more easily in CutList Plus.
Since most of my cut lists will be similar I left click
“Save Filter Changes” to save these selections. Then I
click Finish. An
Import Results message pops up indicating that 21
components were imported. The 21 components agree with
the number of components in my In Model components
library of my SketchUp model. This is not the number of
total parts, since a number of components are used
numerous times. The total number of parts is the some of
the numbers in the “Copies” column in the picture on the
next page.
An
Import Results message pops up indicating that 21
components were imported. The 21 components agree with
the number of components in my In Model components
library of my SketchUp model. This is not the number of
total parts, since a number of components are used
numerous times. The total number of parts is the some of
the numbers in the “Copies” column in the picture on the
next page.


|
Home | Blog | Gallery | Shop Layout | Shop Tour | SketchUp | My Plugins | Free Plans | Contact Feedback | About | Privacy
|