Layers Management Tool |
|
||
OverviewSketchUp is a great tool and one that seems ideally suited for woodworking or more correctly the woodworker. However, like many shop tools we use, there is often missing capability and we woodworkers build jigs and fixtures to overcome those shortcomings. SketchUp is no different. Fortunately, the designers of SketchUp provided a wonderful method for filling the voids in its functionality: the SketchUp Ruby API provides a means for anyone to write Ruby programming language scripts to extend SketchUp’s functionality. Because Layers is such an important tool to the woodworker, one he/she needs to design and document custom furniture, and because SketchUp has missing functionality to manage Layers, I wrote this script (tool). There are two personalities to the Layers Management tool: Layer0 Warning, which attempts to keep one out of trouble by warning the user when he/she changes the active layer to other than Layer0; Layer Tools which are a tool set used to create layers and make them all visible or invisible. Installation of Layers Management Tool
IMPORTANT: Follow These Installation Instructions Carefully
On the Mac/OSX platform the Plugins folder will be located with a path that looks something like this:
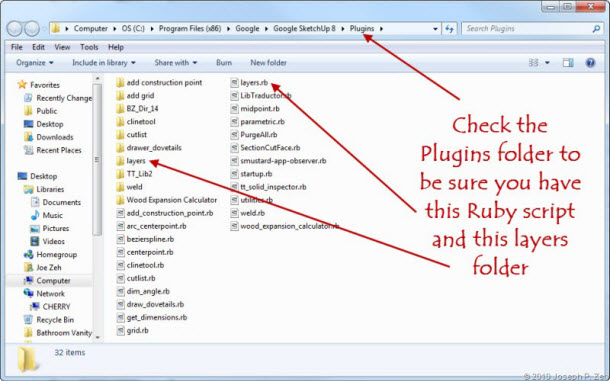
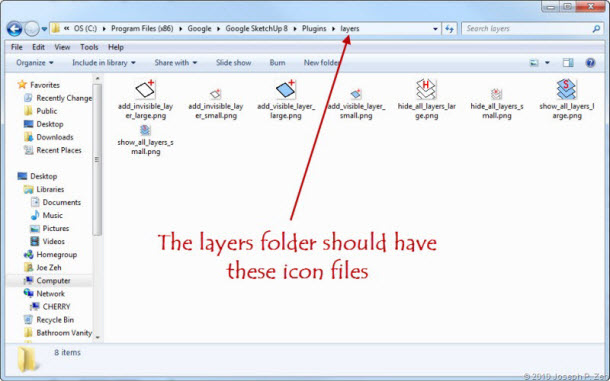
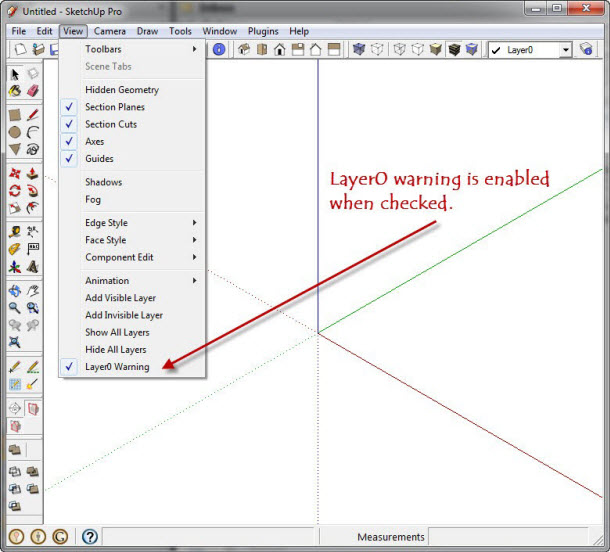
The path on your machine may be slightly different owing to SketchUp and operating system versions. Download the layers.zip file. Open this file with WinZIP (or some other .zip compression/de-compression tool). Before using the ZIP Extract tool be sure all files and folders are selected. Extract all contents to the SketchUp plugins folder. When completed be sure to check that a layers folder (containing eight icons) and the layers.rb script reside in the Plugins folder. See Figure 1. Also check the layers folder to be sure the eight tool icon files are present. See Figure 2. If SketchUp is open close it. On the Mac make sure all model windows are closed and indeed the application is closed. Now reopen SketchUp. Go to the View menu and be sure Layer0 Warning is checked as shown in Figure 3. Lastly, go to menu View/Toolbars and check (select) Layer Tools. This will place the Layer Tools toolbar somewhere on the SketchUp window (or possibly even on your desktop area outside the SketchUp window). You can drag and drop it anywhere you want. Reporting Problems with Layers Management
I hope this script improves your efficiency a little. Please report all bugs and strange behavior to:
Figure 1 - The contents of my Plugins folder showing the layers folder and layers.rb file.
Figure 2 - The contents of the layers folder with eight icon files.
Figure 3 - View menu with Layer0 Warning shown enabled when checked.
Layer0 WarningI have taught SketchUp to a large number of students, mostly through my tutorials. Based on their feedback, and conversations I have had with other instructors, it is clear there are two dominant areas students struggle with.
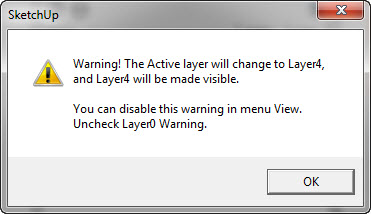
The intent of Layer0 Warning is to let a beginner know when he/she is about to change from active Layer0 (Layer Zero) to another layer. By default Layer0 Warning is enabled the first time layers.rb is installed. From then on the last state of Layer0 Warning will be stored upon closing SketchUp and recalled upon subsequently opening SketchUp. If you wish to disable the warning go to menu View/Layer0 Warning and uncheck it. If you wish to re-enable Layer0 Warning go to menu View/Layer0 Warning and check it. When enabled Layer0 Warning will monitor the active layer; the layer with the radio button selected to the left of its name. If a layer other than Layer0 is made active, a warning message will appear as shown here.
Notice that the message tells you which layer will become the active layer and also how to disable the warning. If a layer other than Layer0 is active and then Layer0 is made active, no warning is given because Layer0 is the desired layer for modeling. Note that this is just a warning; Layer0 Warning will not prohibit the layer change. The user must decide if this change was intentional or accidental. If the latter the user must manually change back to Layer0. Click OK to close the warning message box. I should point out that I am an experienced SketchUp user and I never disable Layer0 warning. It is too easy to accidentally change the active layer and get into serious modeling trouble. Layer Tools
Depending on how you use SketchUp you may find these tools helpful. I tend to use a lot of layers and scenes
in my models; especially when it comes to dimensioning them. For example, I typically use one scene per
dimensioning view and add those dimensions and components to a matching layer. If you add layers via the
Many moons ago I discovered add_hidden_layer.rb coded by Jim Foltz. It allowed me to add a layer hidden to all current and future scenes. It was a life savior, but still had a few minor problems; there was no tool icon and I really wanted to add a layer visible to the current scene but hidden in all others. Another little annoyance is that SketchUp provided no tool to make all layers visible or all invisible, both of which I found I could use frequently. That was when I discovered layers_show_hide_all.rb coded by Madcello. It was perfect except it also had no tool icons. To make my life easier, I combined these tools into one Ruby script adding the tool icons and the visible layer for the current scene functionality. The new Ruby script is called layers.rb and embeds both the Layer Tools and Layer0 Warning functionality. The Layer Tools has the following Menu Items:
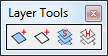
In addition a Layer Tools toolbar is available under View/Toolbars and contains four icons which can be used instead of the menu items above. You make this toolbar visible by choosing View/Toolbars/Layer Tools. The toolbar looks as follows:
There is no Context menu with this tool. Description of toolbar icons:
|

Berkshire Woodworkers

|

|
|
Home | Blog | Gallery | Shop Layout | Shop Tour | SketchUp | My Plugins | Free Plans | Contact Feedback | About | Privacy
|